 Skip to content
Overview and Usage of CAPI
In PeopleSoft, CAPI stands for Configuration Application Programming Interface. It is a toolset within the PeopleSoft environment that allows developers and administrators to automate and streamline the migration of configuration data between different PeopleSoft environments (such as development, testing, and production).
Here’s a more detailed look at CAPI in PeopleSoft:
CAPI provides a programmatic way to migrate PeopleSoft objects and configuration data. This interface is particularly useful for large-scale migrations or when there is a need to automate repetitive migration tasks. By using CAPI, you can reduce manual intervention, minimize errors, and ensure consistent deployment of configuration changes.
Key Features of CAPI
- Automation: Automates the migration process, reducing the need for manual steps.
- Consistency: Ensures that configuration changes are consistently applied across different environments.
- Efficiency: Speeds up the migration process, especially when dealing with large numbers of objects.
- Scriptable: Allows the use of scripts to manage and execute migrations, enabling more complex and customized migration strategies.
How CAPI Works
- Identify Configuration Items: Determine which configuration items (e.g., application definitions, fields, records, pages, components) need to be migrated.
- Create Migration Packages: Using CAPI, create migration packages that include all the necessary configuration items. These packages are typically XML-based files that define the objects and their attributes.
- Transfer Packages: Transfer the migration packages from the source environment to the target environment using standard file transfer methods.
- Apply Packages: In the target environment, apply the migration packages to import the configuration data. This can be done using scripts or command-line tools provided by CAPI.
Steps for Using CAPI
- Extract Configuration Data: Use CAPI commands or scripts to extract configuration data from the source environment. This data is typically stored in XML files.
- Transfer Data: Move the extracted data files to the target environment.
- Load Configuration Data: Use CAPI commands or scripts to load the configuration data into the target environment.
- Validate: Verify that the configuration data has been correctly imported and that all objects are functioning as expected.
- Deploy: Once validated, deploy the configuration changes to the target environment.
Advantages of Using CAPI
- Reduced Manual Errors: By automating the migration process, the likelihood of manual errors is significantly reduced.
- Faster Deployment: Automated scripts can perform migrations much faster than manual processes.
- Repeatability: Scripts and packages can be reused for similar migrations, ensuring repeatability and consistency.
- Scalability: CAPI is well-suited for large-scale migrations where manual processes would be impractical.
Change Management without CAPI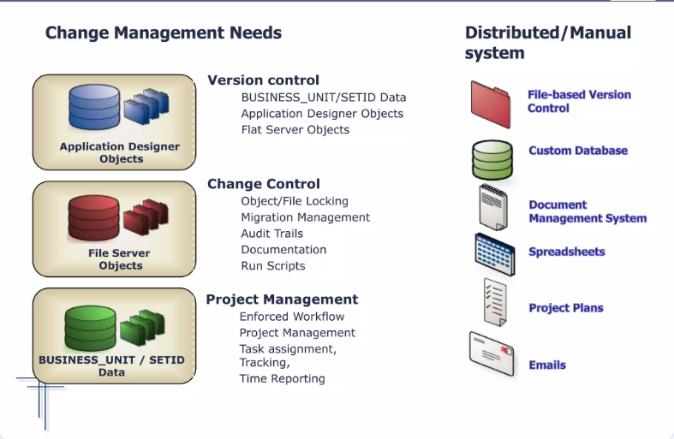
Change Management with CAPI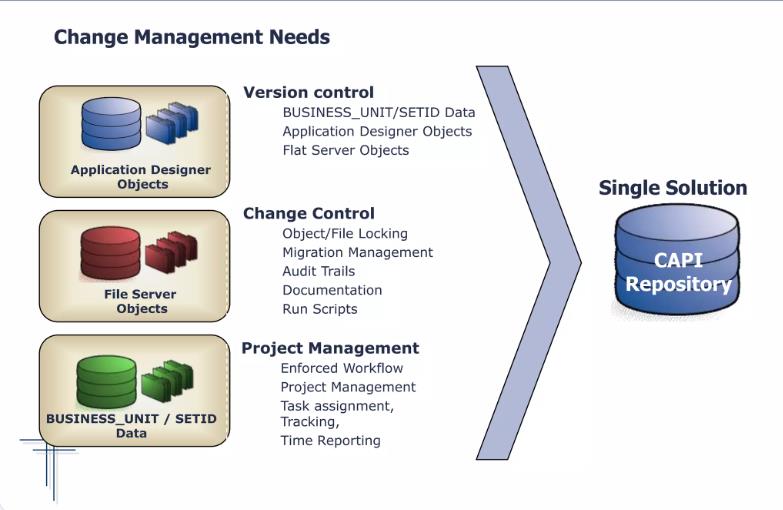
Migrating PeopleSoft objects through Configuration Migration Tools like PeopleSoft Application Designer (CAPI) involves several steps. Here’s an outline of the process:
- Preparation and Planning
- Identify Objects: Determine which objects need to be migrated. Objects can include application definitions, fields, records, pages, components, etc.
- Environment Setup: Ensure both source and target environments are properly configured and accessible.
- Creating a Project in Application Designer
- Open PeopleSoft Application Designer: Launch the Application Designer in the source environment.
- Create a New Project: File > New > Project. Name the project appropriately.
- Add Objects to the Project: Add the objects you identified to the project. This can be done by navigating to Insert > Definitions into Project, selecting the type of object, and adding it to the project.
- Exporting the Project
- Export Project: Once all required objects are added, export the project to a file.
- Navigate to Project > Save to File.
- Choose the location where the file should be saved.
- The project will be saved with a .xml extension.
- Transferring the Project File
- Move the Project File: Transfer the exported project file (.xml) from the source environment to the target environment. This can be done using standard file transfer methods such as FTP, SFTP, or a shared drive.
- Importing the Project in the Target Environment
- Open Application Designer in Target Environment: Launch the Application Designer in the target environment.
- Import Project:
- Navigate to Project > Open from File.
- Select the project file that was transferred.
- The project will be loaded into the Application Designer in the target environment.
- Validating and Testing
- Validate the Objects: Ensure all objects have been imported correctly. Check for any discrepancies or issues.
- Build and Compile Objects: Depending on the type of objects migrated, you may need to build and compile them in the target environment. This is especially important for database objects like records and fields.
- Navigate to Build > Project > Options to select the appropriate build options.
- Execute the build process.
- Test the Migration: Thoroughly test the migrated objects to ensure they work as expected in the target environment.
- Applying Security Changes (if necessary)
- Security Setup: Ensure any necessary security changes are applied. This might include updating permissions, roles, and user profiles to grant access to the migrated objects.
- Final Deployment
- Deploy Objects: If everything looks good in the testing phase, deploy the objects to the production environment following your organization’s deployment procedures.
- Communicate Changes: Inform relevant stakeholders about the changes and updates made during the migration process.
Important Considerations
- Backup: Always take a backup of both the source and target environments before starting the migration process.
- Compatibility: Ensure that the target environment is compatible with the objects being migrated.
- Documentation: Keep detailed documentation of the migration process for future reference and troubleshooting.
By following these steps, you can effectively migrate PeopleSoft objects through the Configuration Application Designer (CAPI).
Conclusion
CAPI in PeopleSoft is a powerful tool that enhances the efficiency, accuracy, and consistency of migrating configuration data across different environments. By leveraging CAPI, organizations can streamline their migration processes, reduce manual effort, and ensure that their PeopleSoft applications are consistently configured across all environments.


